Many of us love playing games on our laptops, but it’s not always easy if you don’t have a high-end gaming laptop. You will need a perfect graphics card, better RAM, a fast display of up to 360Hz, and a resolution of up to 1920 x 1080 pixels.
If you use the PCX2 emulator, you know that playing games on laptops without a swift graphics card is not easy. Most games you will play on the PCX2 will be in a setting that will shred your frame rate or won’t even run at all.
If you have been trying to play the games you love but run too slow, do not play at all, or are experiencing game lag in the PCX2 emulator, Vic’s guide is here to help you find the best settings.
This article shows you how to fix lag on the PCSX2 emulator and also increase your fps up to 60fps on most games. So, without further ado, let’s dive straight into it.
Read also: Best Gaming Phone | Top websites to download PS2 ISO Games | RPCS3 Emulator set-up | Best website to download PS 3
How to Fix PCSX2 Game Lag (PC)
What you will need to change is not much and getting around it is not that difficult. But first, you have to install the PCX2 emulator on your PC. When done, you can follow the process below.
In my opinion, these are the optimum settings to utilize before launching your PCSX2 emulator.
Battery Settings
First, you will need to set your battery performance to high. This is an optional setting, but it enables your battery to work at optimum performance and not cause any lag in gameplay.
Keeping the battery performance at the highest will drain your battery quickly. However, I don’t think this is a problem since most of us play games on our PC when connected to the power supply.
You can always return the battery performance to normal when you are done playing games and only turn the battery to the highest settings when you want to play games. To set the battery to the highest performance, follow these steps;

- First, right-click on your PC Battery Meter (found in the taskbar), then select Power Options from the drop-down menu.
- Select an arrow pointing down (where you see hide additional settings) to reveal additional high-performance power plans.
- After that, whenever you wish to run PCSX2, check the “High performance” to have the high performance.
This setting is available to those on Windows 7. For those of you on Windows 8 or 10, all you need to do is;

- Click the battery meter.
- You should see “Power mode (on battery): Battery saver.”
- Just drag the battery bar to the highest performance.
Again, this setting is optional, but I recommend you should keep the battery performance to the highest when gaming, especially when your PC is connected to the power supply.
PCSX2 PC Optimal Settings
Now, let’s dive into the actual objective of this article, “fix lag in PCX2”. So, to fix any lag in the PCX2 emulator for low-end gaming PC, I recommend you follow these basic steps.
Where all the settings take place is the “Configuration.” You can reach the configuration settings when you launch the emulator as an administrator.
First, Start your PCSX2 program as an administrator. You will see some menus above, but you are only interested in “Config.” Here are the settings of the Config file
You can click on any of the links above to quickly be taken to that section of the setting if you are lost.
Emulator Settings
Here are all the settings you have under “Emulator Settings.”

EE/IOP

- Don’t do anything here; leave everything in the default settings. That is;
- Under “Emotion Engine,” Check Recompiler
- Under “IOP,” Check Recompiler
- Under “EE/FPU Advanced Recompiler options,” Check Chop/Zero for Round mode and Normal for Charging mode.
VUs

- Under VU0, check “micro VU Recompiler.”
- Under VU1, check “micro VU Recompiler.”
- Under Round mode, Check “Chop/Zero.”
- Under Charging mode, check “Normal.”
GS

- Under Frame limiter, Set
- Set Base Framerate Adjust to 100%
- Set Slow Motion Adjust to 50%
- Set Turbo Adjust to 200%
- Under Frame Skipping,
- Set “Frames to Draw” to 2
- Set “Frames to skip to 2 as well.
GS Window

- Set Aspect Ratio to “Fit to Window/Screen”
- Set Custom Window size 921 x 717 or 1024 x 720, if you have up to laptop screen is up to 1080p.
- Set Zoom to 100.00
- Uncheck “Disable window resize Border.”
- Uncheck “Always hide the mouse cursor.”
- Check “Hide Window when Paused”
- Uncheck “Default to full-screen mode on open.”
- Check “Double-click toggles full-screen mode
- Uncheck “Wait for Vsync on refresh.”
Speedhacks

- Ensure Enable speed hacks are checked
- Set EE Cylerate to -1
- Set VU cycle stealing to 0
- Check Enable INTC Spin Detection
- Check Enable wait for Loop direction
- Uncheck Enable Fast CDVD
- Check mVU Flag Hack
- Check MTVU (Multi-Threaded microVUT)
Game Fixes

The only thing you will want to check is “Preload TLB hack to avoid TLB miss on Goemon.”
After you’ve done all this, click “Apply.”
Video Settings

When you are done with the Emulator settings, the next setting is the Video Setting.
- On the Config menu, hover Video settings, then click “Plugin Settings.”
- Change Interlacing (F5) to Auto. Then press OK.
That’s all in this category.
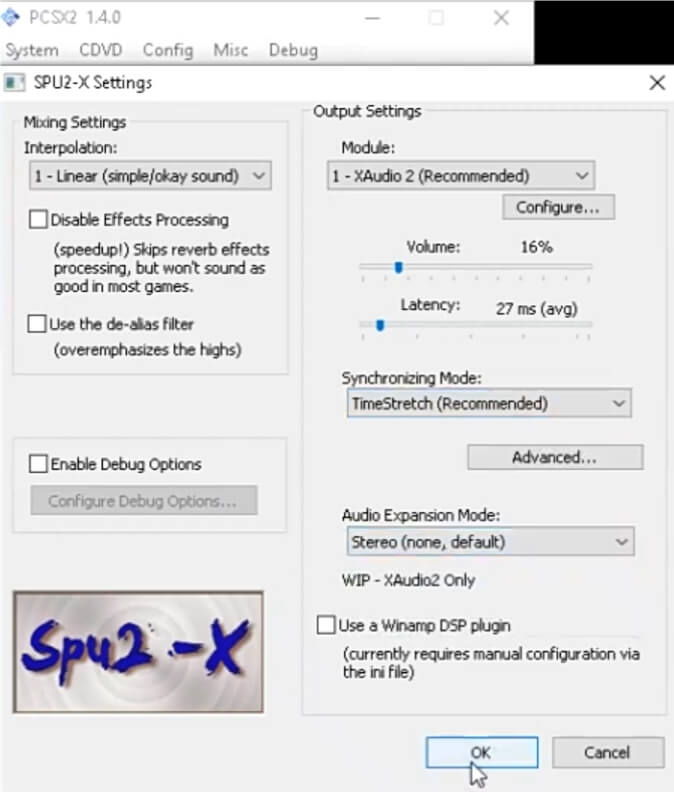
Audio (SPU2)

- Go to the Config menu, then click Audio.
- Next, click “Plugin settings.”
- Under Mixing Settings, set Interpolation to 1-linear (simple/okay sound)
- Under Output Settings, set Module to 1-XAudio 2
- Set synchronizing Mode to TimeStretch
- Audio Expansion Mode to stereo (none default). Then click OK.
When you are done with all these settings, you shouldn’t be experiencing any lag.
Read Also: Best websites to download PS3 Games | RPCS3 Playstation 3 Emulator Full Setup Guide
Final Thought
The settings above should fix lag in the PCX2 even if you are using a low-end PC. However, If you are experiencing any difficulty, let us know in the comment section below.


